Dragonfly Belt Favor
Alastar and I have decided to fight for each other in the first Crown Tournament run using Rapier.
For this, I decided to make a belt favor for him to wear. This is my first time making a favor!
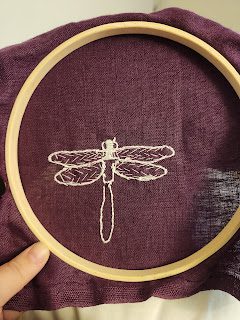
I decided to embroider a white dragonfly on purple linen, to be reminiscent of my personal heraldry (Purpure, a pall inverted raguly between three dragonflies argent).
This time, design choices are up to me! While looking for inspiration, I found a YouTube video that has a really cool technique for dragonfly wings. It's the Honeycomb stitch by Vivebooks.
(https://youtu.be/cO0jo2e2FKo?si=gkN3xANqBRU8Gy0v)
Using this, I first draw on a design of a dragonfly using a heat erasing pen.
For this design, I could choose whatever stitches I want. This is no kit anymore!
For the outline, I decided on a whipped backstitch. Then, I followed the instructions on the video for the wings. I thought the technique was really cool in that it precisely pulled the threads sitting on top of the fabric.
After completing the wings and the outlines, I decided to fill in the body of the dragonfly with satin stitch. I tried to pay close attention to getting to the edges of the outline, but it was a bit harder in some areas than others.
(And the back at this stage, if you were curious)
For the eyes, I first thought I could do an interesting grid or weave stitch to make it look the most like an insert.
However, I decided that I didn't really like that look. Instead, I did a smaller version of the Honeycomb stitch that I used for the wings. I really liked how this came out since it gave the dragonfly a bit more personality and tied in the design from the wings to the eyes.
Then, I finished up with the rest of the filling stitches. Though I decided to switch to vertical stitches on the tail to help note the different sections. Overall, I'm really happy how it came out.
To finish, I decided to hand-sew the favor closed. This was my first time hand-sewing anything!!
I did a reddish thread and backstitched around the majority of the border.
Start date : 1 / 19 / 2025
Finish date : 2 / 13 / 2025


Comments
Post a Comment